Reverse Canvas: How To and Project Idea
Here is a reverse canvas project idea for you. It is a fun and easy way to add a personal touch to your home décor. The framed canvas makes it look fancy but it is pretty easy and inexpensive to create. You can add as few or as many embellishments to it as you like. This project was created using craft supplies I already had on hand but if you are in need of some, I will include links for your convenience.
**This post contains affiliate links. When you click these links I may make a commission on purchases made through those links. As an Amazon Associate I earn from qualifying purchases.** For more information, please see my Disclosure Policy.
Unlimited Design Possibilities with the Reverse Canvas Method
The reverse canvas project can be made in so many ways. A lot of the ones I have seen are just a quote or phrase, cut out of adhesive or heat transfer vinyl applied to the canvas. I wanted to add some oomph to the project, so in addition to the heat transfer vinyl, I added a printed heat transfer image, glitter, and artificial flowers.

“It wouldn’t be fall without a pumpkin and some Mums.”
DIY Reverse Canvas Step by Step Tutorial
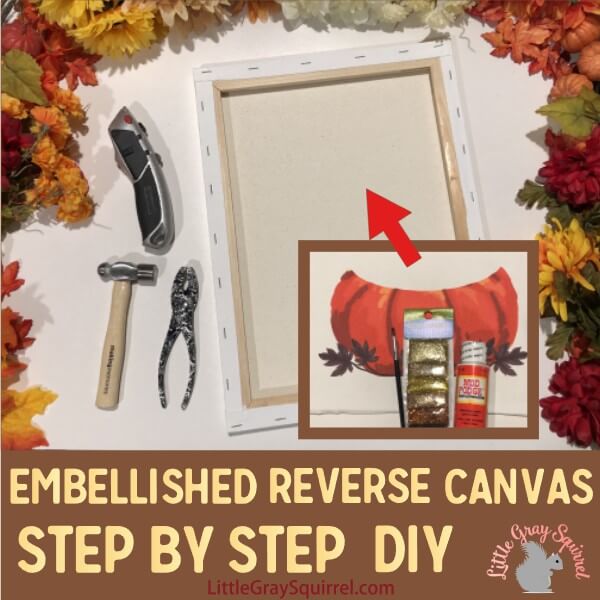
Supplies:
- Stretched Canvas
- Utility knife or razor blade
- Pliers (optional)
- Wood stain (optional)
- Disposable gloves
- Foam brush
- Lint Free Cloth
- Inkjet printable transfer for dark fabrics
- Heat Press or Iron
- Mod Podge
- Fine paint brush
- Super Fine Glitter
- Pencil
- Scissors
- Hot glue gun and glue
- Artificial flowers mums or sunflowers
- Sawtooth hanger and nails
- Needle Nose pliers
- Silhouette or other cutting machine
- Inkjet printer
- Weeding tool
Here is how I created the Welcome Fall Reverse Canvas:
- Place canvas face down on your work surface. Cut the canvas, on the back, around the edge, just outside the staples.

- Remove the front of the canvas and set it aside.
- Remove the remaining canvas from the back and remove or hammer down any loose staples.
- Paint or stain the frame, let dry. You can leave the frame raw if you prefer.
- Download the Welcome Fall cut file from my free resource library.
- Cut the “Welcome Fall” out of Heat Transfer Vinyl. See instructions below if needed.
- Print and cut the pumpkin. See instructions below if needed.
- Choose the side of the canvas you would like to use as the front. I chose to use the white, “front” side, but the tan, canvas side would look nice too depending on the final look you are going for.
- Set the frame on the canvas and place the pumpkin where you would like it to be.
- Remove the frame and while holding the pumpkin in place, set it on the bed of your heat press or ironing setup. Press or iron the pumpkin on according to manufacturer’s specifications.
- Place the frame back on the canvas, line up the pumpkin, and now, place the “Welcome Fall” text where you would like. Remember, you will be adding flowers above the pumpkin, so leave space for those. Place the canvas back on the bed of your heat press or your ironing setup and press. Remove clear carrier sheet.
- Using a fine tipped paintbrush, paint Mod Podge along the edge of the leaves, stems, and the veins of the leaves. Sprinkle glitter over the mod podge and gently shake it off. Work over a large piece of paper so you can capture the loose glitter and reuse it.
- Place the frame on the canvas and center it on the design.
- Draw a line along the outside of the frame on the canvas.
- Set the frame aside and trim off the excess canvas, cutting about 1/8” inside the line so the canvas doesn’t show from behind the frame when it is finished.
- Lay the canvas design side up and test fit the frame. If the canvas doesn’t need to be trimmed any, you are ready to attach the frame to the canvas.
- Turn the frame over to the smooth, back side. Run a bead of hot glue around the perimeter of the frame. Turn the frame back over, line it up, and press it into place on the canvas. Press down firmly, around the frame until the glue cools.
- Choose the flowers and leaves you want to use to fill your pumpkin. I used 5 Mums and about 8 leaves from flowers I bought at Dollar Tree.
- Trim off excess plastic from the flowers that would prevent the flowers from laying flat on the canvas.
- Place the silk leaves and flowers where you want them.
- Set the flowers aside, in the order you want (sometimes I even take a picture of how it looks so I can refer back if needed)
- Glue the leaves onto the canvas, just above the pumpkin outline, leaving the bottom of the leaf loose.
- Glue the bottom of each flower and apply it to the canvas. Make sure you glue the fabric of the flower, as well as the center plastic part on the bottom, so the flower stays intact when you hang it.
- Fluff the flowers so they are all full.
- Hang your handmade decor.
- Add a sawtooth hanger on the back.


How to Cut the “Welcome Fall” out of Heat Transfer Vinyl
- Download the free Welcome Fall file from my resource library.
- Open the “Welcome Fall cut file for reverse canvas” SVG or .studio3 file
- Choose one of the five text options available in the file and place it on the cutting area in your software.
- The text in the free file has NOT been saved as a reverse image for using Heat Transfer Vinyl (HTV). You can flip it horizontally before sending it to cut, or when you select Heat Transfer Vinyl in the Silhouette software and click “send”, the software will ask you to flip the image, or cut as is. Go ahead and allow it to flip the image. Cut settings can vary by blade and machine so it is recommended to do a test cut when switching materials or blades.
- Load the heat transfer vinyl shiny side down in your machine if cutting without a mat, or put the vinyl shiny side down on your mat and load it into your machine.
- Select heat transfer vinyl for the material you are cutting.
- Send the design to the machine to cut.
- After cutting, unload the machine and remove the vinyl from the mat if used.
- Trim off excess vinyl from around the text you just cut.
- Using a dental pick or your favorite weeding tool, weed the excess vinyl.
- Continue with step 11 after printing and cutting the pumpkin transfer.
How to create the heat transfer pumpkin and Welcome Fall heat transfer:
- Download the files from my resource library (free for my email newsletter subscribers). Open the file in your Silhouette Studio Software (or Cricut but the steps may be different). It should open centered on the page with registration marks turned on, but if not, place it in the center of the page and turn on registration marks.
- Load the printable transfer paper into your printer with the printable side facing the correct way according to your printer.
- Select “send to print” in your Silhouette Software. Set your printer preferences to correct page size and print quality. I used standard, border less, premium matte paper type. Save or apply the settings and print.
TIP: I use Neenah Jet Opaque Heat Transfer Paper for Dark fabrics. I like using the opaque version even on light background because the colors stay vibrant after pressing.
How to cut the printed pumpkin:
- Place the printed sheet on your mat and load into your Silhouette.
- Set your blade if needed. The settings I use to cut the Neenah printable transfer are blade 2, force 12 speed 5.
- Send to machine to cut.
Continue with step 8 above.

I hope you try an embellished reverse canvas project. If you do, please tag me on Instagram @littlegraysquirrel I would love to see it!
Best,
Megan