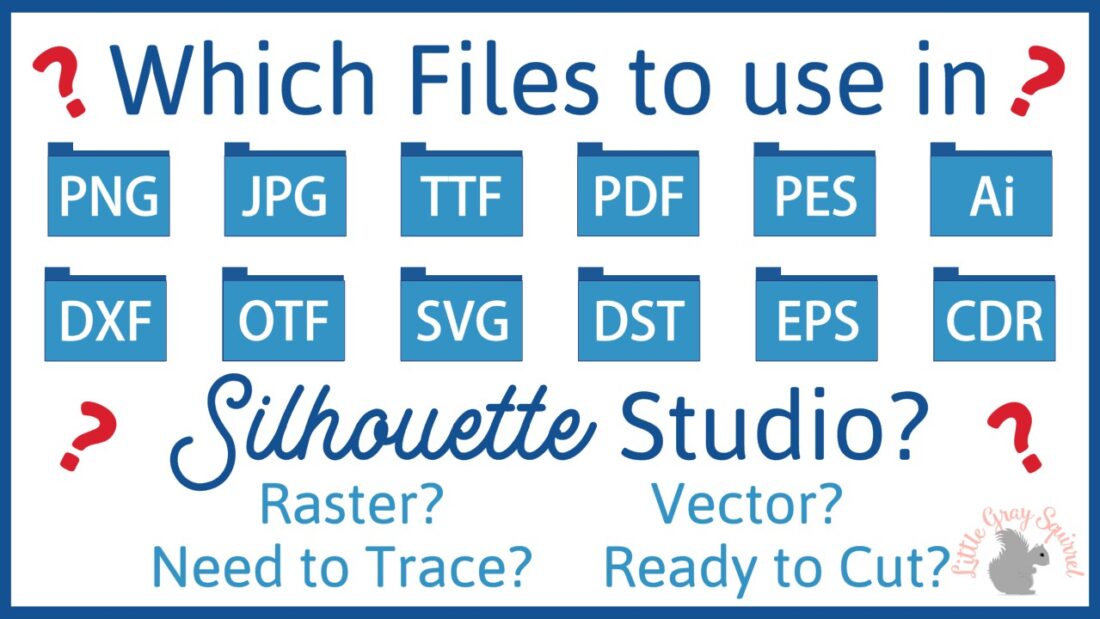
What files can you open in Silhouette Studio
If you have ever wondered what files you can open in Silhouette Studio and which one is the best to use for your project, then you are in the right place.
Depending on which edition of the software you have, there are many file types that can be opened in Silhouette Studio design software.
It is always important to choose the best file for your project and the Software edition you have.
Knowing which files to use in Silhouette can save you time, money, and frustration.
**This post contains affiliate links. When you click these links I may make a commission on purchases made through those links. As an Amazon Associate I earn from qualifying purchases.** Please read our disclosure policy for more information.
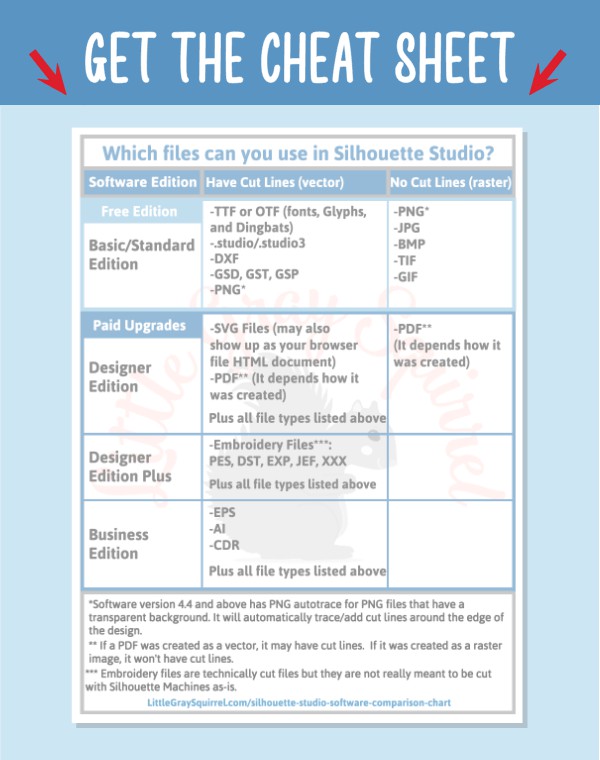
I created a “cheat sheet” that breaks down which files can be used in each edition of Silhouette Studio. You can easily see which file types have cut lines and which might not.
It is available for now in my resource library for my newsletter subscribers.
Click here to grab it now and follow along while you learn all about what file types you can use in Silhouette Studio.
Where to cut files, fonts, and designs for free or super cheap
If you are wanting to build your library of fonts and designs from legitimate sites, I have a list of 30+ sites to get loads of free and cheap fonts, cut files, and graphics for you to use with your Silhouette. And, they include commercial use!
What are cut lines in Silhouette Studio

So real quick I want to make sure you know what cut lines are.
Cut lines are a line (also called a path) that has a weight or thickness of 0. If the line has a corner or bend in it, those are called points or nodes.
Paths and points are how you tell your machine where to cut on your materials such as vinyl, HTV, paper, fabric, magnet sheets, felt, etc.
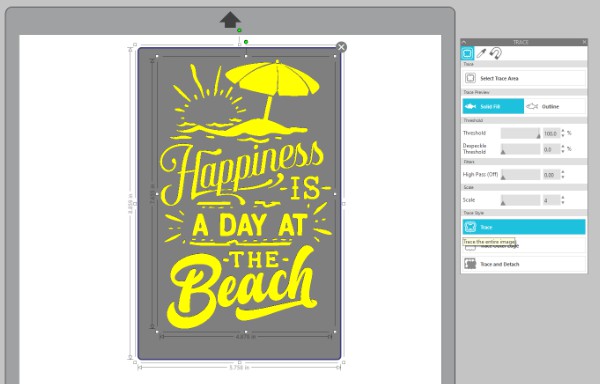
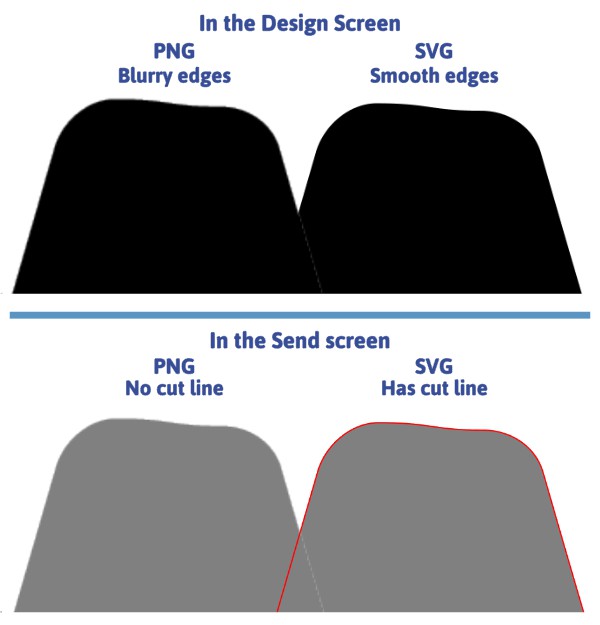
So if you open a file in Silhouette and go to the send panel and you see bright red outlines around the design (like the design on the right in the image above) that is showing you where your machine will cut.
Technically the image above has cut lines (bright red lines) on both examples but the cut line around the rectangle of the image is frustrating for a lot of crafters to see.
If the design doesn’t have the bright red line around the parts of the design you want to cut out (like the image above on the left) then it isn’t a cut file and needs to be traced first or, if it is the proper type of file you might just need to select the design and set the line to cut or cut edge in the send panel.
There are lots of different kinds of projects that you might want to create where you don’t want the entire design to be cut out like if you were making stickers that has an image and text on it for example but today, we are talking about how to know which files you should be using to be able to cut out your entire design like for a vinyl decal, a t-shirt design made out of HTV, a paper flower, etc.
Save time and money by knowing which files to open in Silhouette Studio
Knowing the difference can save you time because if you have a file that is already a cut file, you don’t need to trace it.
It can save you money because you will learn which file types your software can and can’t use so you don’t spend money on a file that your edition of the software can’t open.

I have seen many Silhouette users frustrated by the file type not supported pop up warning.
How to avoid the file type not supported warning in Silhouette Studio
There are two reasons that I usually see that can cause you to get the file type unsupported warning
1. You are trying to open a file in a zipped folder
If you buy or download files online they will most likely be in a zipped folder.
To fix this you need to extract or unzip the folder before you can open the files in your software.
2. You aren’t using the proper upgraded edition of the software for the file type
If you don’t have the proper upgraded edition of the software to open the file type or your software upgrade license isn’t activated then you won’t be able to open the file.
To fix this, make sure you have purchased and applied the proper upgraded software license key. You can apply it in your Silhouette Software under the Help tab or in your Silhouette America account.
I have a video showing how to install Silhouette Studio and activate your license key here.
It is then activated by logging into the library in Silhouette Studio and if you have Business Edition, make sure you are viewing the software in Business Edition.
Business Edition allows you to switch between edition upgrades by going to Help, View in, and choosing Business Edition (or any of the other editions).
Choosing the correct file type for Silhouette Studio
The main difference in the files is that some have cut lines and some don’t. There is even one file type that the software will add cut lines for you automatically if you want it to.
There are lots of ways to use these file types for all sorts of applications so they might be used in a different way for some people.
I am not an expert on the technical aspects of these file type. My main goal here is to help you know your options as far as what file types you can use in the Silhouette software edition you have and why you might choose one over another.
I will try to explain the different file types as they pertain to crafters using the Silhouette Studio software and a Silhouette cutting machine.
What are raster and vector files?
These are the two main types of files that you may encounter when creating with your Silhouette cutting machine.
Raster
Raster files are made up of pixels which are tiny colored squares. If you zoom way in on a photo you took on a camera for example to enlarge it or shrink it down really far it would get blurry. If you get close enough you could see the tiny pixels that make up the image.
The Silhouette software doesn’t “see” the edge of the image unless it is a transparent PNG (see below for more info on those) and the machine isn’t able to cut around or along each pixel so the image would need to be traced to add a cut line if you wanted to cut the image out.
Examples of raster files that you can use in Silhouette Studio are PNG*, JPG, BMP, TIF, GIF, and PDF**.
Examples of software that create raster designs are Photoshop, Microsoft Paint, Corel Painter, GIMP, and Procreate.
As I just mentioned, photos are raster files. Most clipart and sublimation files are also raster files.
If you draw a design and scan it to use in your software it will also be a raster image once it is on your computer.
Raster images are most common for doing print and cut projects where you print out the image and then cut around the perimeter or cut around a shape that the image is in like making stickers, greeting cards, printable heat transfers, pin back buttons or magnets, sublimation, there are so many great ways to use raster images with Silhouette software and machines.
File size, why does it matter?
When I refer to size when talking about raster or vector images it is the file size in Kilobytes (KB) or Megabytes (MB) not the length or width of the image after opening.
Larger files take up more space on your hard drive and can slow your computer down if you don’t have enough storage for the computer to operate properly. Large files can also cause your software to crash.
Explanation of different raster file types
All of these raster file types can be opened in any of the four editions of the Silhouette Software.
PNG* – Portable Network Graphics
These are a raster image that have a fixed number of pixels and do not lose any quality when they are compressed. These are usually a higher quality image than JPG files and are most common for graphics for printing and sublimation files. They are larger in file size than other raster images such as JPG files.
*I also included PNG file format in the column for file types that have cut lines but with an asterisk. That is because version 4.4 of the Silhouette Software added a png autotrace feature.
If you have the autotrace feature turned on in the import tab of the preferences (it is on by default but can be turned off) and you open a transparent png in the software it will add a cut line around the edges of the image. It won’t necessarily trace around each color to cut like an SVG would and it can eliminate parts of an image that have light colors like pink or yellow or gradients of color but it works very well if you just need to cut around the outline and hollow parts of the design.
If you are using an image that you only need to be cut around the edge a transparent PNG file like when making stickers, it would be just fine to use PNGs and you can use PNG files in any edition of the software.
Tip: When an image is traced or autotraced in Silhouette Studio the parts of the image that are no longer visible don’t actually go away. You can turn on point editing mode and move lines and points to show part of the image that looks like it was cut off.
JPG or JPEG – Joint Photographic Experts Group
A very common image file type that is often used for digital images because they are a smaller file size than PNG and are fine for using online for websites, social media, and images that will stay in a digital format. You can use them in Silhouette Studio but if you are printing it then you will want to get the highest resolution available or just go with the PNG file. PNG would be preferable than JPG or other raster file types.
BMP – Bitmap
Bitmap files are uncompressed high quality raster files. They can be used the same as PNG or JPG files in Silhouette Studio and would be a better quality image but due to their size they are not often offered as a file type when buying files online for crafting.
TIF or TIFF – Tag Image File Format
These are also lossless files and are often used by photographers. It maintains the quality of the image. They are also larger file types and less common than PNG when purchasing files online but you can open them and use them in the software like any other raster image if you have them.
GIF – Graphics Interchange Format
Your first thought when you see GIF is probably the funny short videos shared on social media. GIF files support static images or animated images but when opened in Silhouette Studio it would just be a static image. GIFs are also not a common file type for crafters but can be used. I wasn’t even able to find a way to actually download one to try.
Vector
Cut files. files that are ready to cut in machines like Silhouette and Cricut are vector files.
Vector files are made of lines called paths that are connected by points or nodes. When you zoom in, or enlarge a Vector file, the image looks the same, only larger. It doesn’t get pixelated like a raster image.
The lines of the vector files are where the tool in your cutting machine travels.
You don’t have to just cut, etch, or draw vector files, you can also print vectors that have had the lines thickened or been filled with color.
Examples of vector files that can be used in Silhouette Studio (depending on which edition you have) are .studio/.studio3, DXF, GSD, GST, GSP, SVG, PDF**, PES, DST, EXP, JEF, XXX, AI, CDR, and EPS
Examples of software that creates vector images are Silhouette Studio, Inkscape (free software), Photopea (free, web-based), Adobe Illustrator, and Corel Draw.
Types of vector files
.studio/.studio3 – Silhouette Studio file type proprietary to Silhouette America
You can only get these files from the Silhouette Design store, for free from bloggers like myself (my free files are in my resource library) or if you share a file with another silhouette user, and when you save a file you create in Silhouette Studio.
.studio3 is the latest version of the format and will show you a thumbnail picture of the design on your computer without having to have a special software installed to show thumbnails.
.studio files are of course able to be opened in all editions of the software.
DXF – Drawing Exchange Format
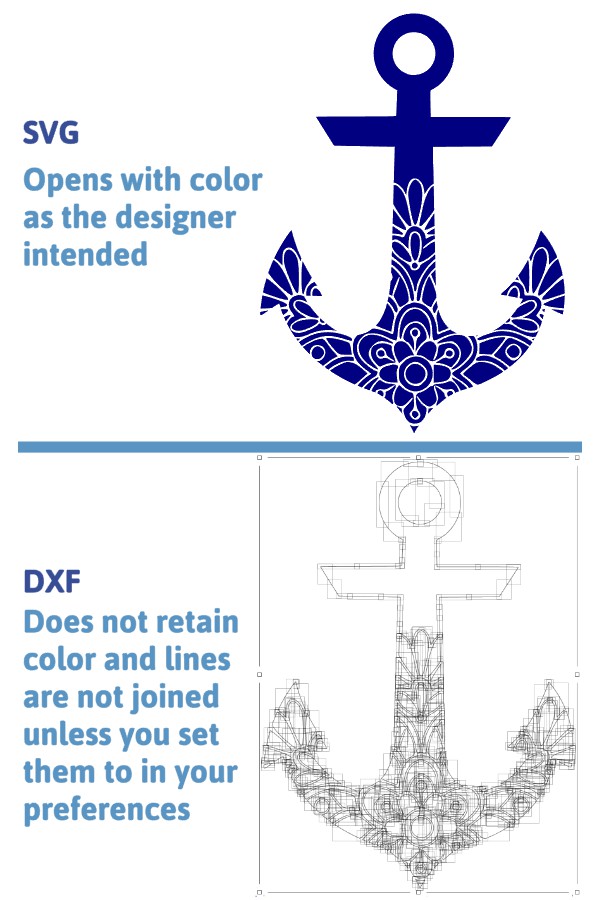
This is a cuttable file format that was created by AutoCad and is used for many plotters to draw or cut lines. It does not retain color like an SVG does (see photo above) and unless you set it to join lines into polylines in the import panel of the preferences, the lines will all be disconnected when you import the file (see photo above).
You can use DXF files in any edition of the software. If you only have the free basic/standard edition of the software then DXF is the best file format you can get when purchasing cut files to use. Some designers don’t include DXF file format when selling files so it is important to check to see if it is included if you don’t have Designer Edition or above.
GSD, GST, GSP – ROBO Master Format Graphtec proprietary file type
These are not very common files for Silhouette crafters unless you have a Graphtec plotter. Did you knos that Silhouette America was actually founded by Graphtec? If you have access to these file formats, they would also be a good choice as a cut file if you only have the free basic/standard edition of Silhouette Studio. They can be opened in any edition of the Silhouette software.
TTF/OTF – True Type Font/Open Type Font
These are font files that you install on your computer to use in your software. OTF is the better option if you have a choice between the two as it can handle more glyphs. Some fonts are only available in TTF format. That is ok too.
I have more information on installing fonts here.
Since fonts are installed on your computer, they are able to be used in any edition of the software however you need Designer Edition or above to access the built in glyph support tab in the text style panel. Otherwise you can use the Character Map (Windows) or Font Book (Mac) to access glyphs.
SVG – Scalable Vector Graphics
This is probably the most common file format for cut files for crafters since they can be also be opened in Cricut software and many other cutting machines and lasers.
SVG has become synonymous with the term cut file even though SVGs are also used for web graphics and even basic animation. I have even heard of some inexperienced Etsy sellers selling a raster file like a PNG and calling it an SVG because you can remove background and cut the contour edge of a raster image in Cricut Design Space.
Be sure that the file(s) you are purchasing actually include the SVG file if you need or want the SVG cut file. If you buy one that doesn’t include it after they stated in the title or description that it is an SVG file, contact them to fix it or refund you.
If you download an SVG file and don’t see it listed in the different file options, look for the HTML file. Since a lot of computers don’t have a design software that automatically opens SVG files, the computer will default to open the SVG with your browser (it may show a Microsoft edge logo instead of a thumbnail of the design image).
If you have Inkscape installed on your computer it may show up as an Inkscape icon. You can still open it in Silhouette Studio by dragging the file in or going to File, Open or File, Merge.
If you double click on an SVG that has a Microsoft Edge or Inkscape icon it will open in one of those programs.
You need to have at least Designer Edition upgrade of the Silhouette Software to be able to open SVG files but they are the best file format to use because they maintain any colors that the designer added. You can also ungroup or release compound path to easily separate the design to cut different parts out of different colors or materials. They are also typically smaller in file size than raster images so they don’t use up as much computer resources (unless they have loads of points like a distressed design might have).
PDF** – Portable Document Format
This format was created by Adobe as a way to save a file that people would be able to open even if they don’t have the same software as the person who created the original file.
You can open PDFs in Designer Edition and above.
** I also included PDF in the column for files that don’t have cut lines because PDF files are a bit of a wild card when choosing files to use in Silhouette. They can be either raster or vector. It depends on how the document was created.
If the document was created by drawing shapes or typing text in a vector software like Adobe Illustrator or Silhouette Studio for example, then when you open it in Silhouette Studio and choose to open as vector, it will have cut lines.
If the PDF includes JPG, PNG or other raster images or if it was created on software that creates raster images like Procreate or Paint, then it would not have cut lines when it is opened in Silhouette Studio.
PDFs don’t often have a transparent background so a transparent PNG would be the preferable file to use to open a raster image than a PDF.
Flattening the PDF (merging all the layers together) when saving it can prevent it from being a complete vector file that can be simply cut like an SVG in Silhouette Studio. It would cut more like a transparent PNG.
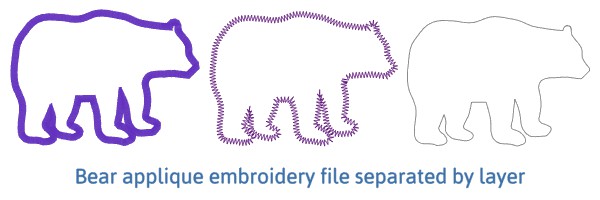
Embroidery Files
Technically, embroidery files are vector files. You can open an embroidery file in Designer Edition Plus or above in Silhouette studio and cut it. However, it will most likely be a bunch of jagged lines and cut as if the blade was making little stitches because that is what the file tells the software or embroidery machine to do.
You can open several types of embroidery files in Silhouette Studio and modify them to create and cut appliques or otherwise use it to cut materials with your Silhouette machine. They are not meant to cut as-is.
Some embroidery files, particularly ones that were created to be used to applique will have a layer that has a single line for cutting. After opening the file, grab the line of the shape and drag it away until you get to a single line that is the outline of the shape like the shape on the right.
A unique way to use embroidery files is with a sketch pen. Insert a pen in your silhouette instead of a blade and the software will sketch the design the same way it would have stitched it in an embroidery machine.
Be sure to clean up the design before sending it to sketch. Select the design and change the line thickness (weight) to 0 to see better where the line will sketch and delete lines that skip across the design, those are not needed when sketching.
Examples of embroidery files you can open in Silhouette Studio are DST, PES, EXP, JEF, and XXX.
Some embroidery files may include an SVG, that is the file type you would want to use for cutting a design for applique without having to separate the lines of the file or trace or draw the design yourself.
EPS – Encapsulated PostScript
I’m not sure if this analogy is 100% correct but I like to think of EPS files as the PDF file of the vector world. They are usually created in a vector design software and are chosen as a file format because they maintain their quality and can be opened on many types of software, not just the one it was created in.
These are often used as a file type by designers who create vector designs professionally.
They are also often the type of file that you might get as a bonus file that comes with a font if it includes illustrations or icons.
You need Business Edition to open EPS files.
They are most often vector files unless they have been flattened, then like PDF they may only have the outline as the cut line.
Any EPS files that I have opened so far in Silhouette Studio have had cut lines.
EPS files are used by professional print shops for high quality printing. Their files are much, much larger than SVG files. I have the same file here in five formats.
The EPS file is 100X larger than the SVG file and 2.5X larger than the DXF file.

Tip: If you have problems with your silhouette software crashing, use a file type that has the same or similar information in a smaller size. For example an SVG file can be 1000x smaller than an EPS file and even 40X smaller than a DXF file with the same image.
AI – Adobe Illustrator
AI is a file format that is proprietary to Adobe and is created in Adobe Illustrator. Illustrator is a popular software for professional cut file designers and AI files are sometimes included in design files you buy or download online. It is more common though for designers who work in Adobe Illustrator to save as an SVG for crafters. But you may encounter AI files.
You need Business Edition to open AI files.
CDR – Corel Draw
This is a file type that is proprietary to Corel and created in CorelDraw software. It is most likely a vector file type but some CDR files can hold raster images.
It is less common to come across these in craft files you buy online.
You need the Business Edition of the software to open CDR files.
Tip: When organizing your files, if you have Designer Edition of the software and the file offers both an EPS and an SVG file, as long as they have the same design, you don’t need to keep the EPS version of the file. Same goes if you have Business Edition. Just keeping the SVG and deleting the EPS will save you a good amount of storage space.
Converting files to SVG
Can you convert raster files to use as cut files in Silhouette Studio?
People often ask about converting raster images like jpegs and pngs to vector images so they can be cut.
There are programs online that will convert a PNG or JPG to an SVG for example but from what I have seen, it is basically an auto trace. It would work better on a solid color design that doesn’t have any gradient or distressed part of the image and text doesn’t usually trace well.
If you need to create a cut file from a raster image it is better to do it yourself by tracing it in Silhouette Studio and then edit it to get it how you want.
This is an example of three different png files that were converted to SVG file format with varying levels of success. The light pink star with gradient wasn’t even picked up to convert to an SVG.

The darker parts of the flowers and part of the outline showed up in the SVG version but it wouldn’t be a very clean file to cut.
The Santa’s sleigh converted the best because it is a black image. High contrast with less detail is best for converting. Having said that, opening a transparent png of the same Santa file in Silhouette Studio would give you just as good auto trace or tracing it yourself would trace well too and you don’t need Designer Edition to open PNG files in Silhouette Studio but you do to be able to open an SVG.
Grab the cheat sheet I created from my Resource Library so you can have it as a quick reference guide.
Understanding which file types you can open and use in Silhouette Studio will help you know:
- How you can use the files and use the best one for your project.
- Which files to buy/download based on the Software Edition you have
- Which files already have cut lines.
Read product description when buying files
When you are buying files online from Etsy, or a design marketplace like Creative Fabrica, Design Bundles, The Hungry Jpeg, etc. Be sure to read the description of the product to see what file types it includes.
It is very common for Etsy sellers to only include a PNG of a graphic that is meant for print and cut or only include an SVG file and it will be your responsibility to make sure you or your software is capable of using it in the way you are hoping for.
Alternatively, some files, as I mentioned above with bonus files that come with some fonts, will only include an EPS file. If you don’t have Business Edition, you won’t be able to open them unless you can find a file converter that works (or a free program like Inkscape or Photopea that will open them and let you save it as a file type that you can open in your edition of the software.
I hope you have found this information helpful in choosing what files to use for your next project.
If you have any questions about your Silhouette Software or cutting machine ask me in the Silhouette Craft Community Facebook group https://www.facebook.com/groups/silhouettecraftcommunity . I would be happy to help.
Best,
Megan