
Printable Handmade Notebook
Making your own notebooks can be quick and easy with a printable PDF and just a few supplies. This tutorial will take you through step by step but all you have to do is choose which notebook you want to make, print out the pages, cut them out along the printed lines, fold, glue together and you’re done!
**This post contains affiliate links. When you click these links I may make a commission on purchases made through those links. As an Amazon Associate I earn from qualifying purchases.** Please read our disclosure policy for more information.
Get the printable notebook file for only $3
I created this file so it is ready for you to print out and cut with just a craft/hobby knife and straight edge.
There are three notebook options. Each file includes a page with the cover, a page with the pocket, decorative strip, and optional blank labels, and a page with two notepad pages.
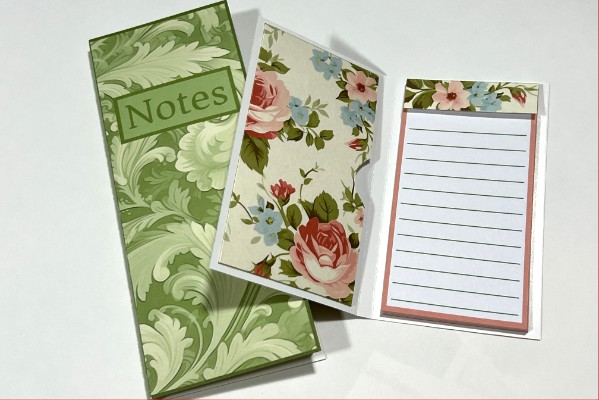
9″ x 3.5″ Green Leaves notebook
9″ x 3.5″ Roses notebook
6″ x 3.5″ Roses notebook
**You will need a printer that can print on thick cardstock to print the cover and the sheet with the pocket and decorative strip**
This is the printer I have in my craft room. It has a rear feed slot so the paper can travel straight through the printer without needing to bend the paper. You can read more about the printer I use here.
What kind of paper to use for making a notebook
I buy poster board from Dollar Tree in 22’x28′ sheets and cut down to 8 1/2″x11″ sheets. This is a pretty cheap way to get sheets of thick paper. They end up at about $0.18 for the two pieces for one notebook and then the copy paper is about $0.15 for the notebook pages.
You can also buy 8 1/2″x11″ sheets of cover stock that are ready to print on but cost closer to $0.40 per sheet or 11″x17″ sheets for about $0.30 a piece that just need to be cut in half. It can save a little money to cut them down yourself if you have time. It can be difficult buying paper online though because the thickness or weight can be measured in different ways for different types of paper.
How to make notebooks for yourself, to give as gifts, or to sell.
Printable Notebook with Cover, Notepad, and Pocket
Materials
Tools
Instructions
Open the Files
The ready to print files can be purchased here:
The zipped file includes three notebooks in PDF format
- Green 9 is the 9”x3 ½” Green Leaves Notebook
- Rose 9 is the 9”x3 ½” Roses Notebook
- Rose 6 is the 6”x3 ½” Roses Notebook
The Roses Notebooks have the same pattern but one is the same size as the Green Leaves one and the other one is shorter.
Print the pages
1. Unzip the folder on your computer.
Open the file folder for the notebook you want to create.
Open the file for the notebook cover.
Load one sheet of the 8 ½”x11” cardstock into your printer's feed slot, not the paper tray. If you are using poster board that has a shinier side, put it in so the image will be printed on the side that isn’t shiny.
Set your printer to print on cardstock, standard quality print and print.
2. Open the pocket file and print the same way you printed the cover. Using the cardstock, standard quality setting, printing on the side that isn’t shiny.
3. Open the note pages file
Load the copy paper in the printer’s paper tray.
Set it to print on regular copy paper, standard quality is fine, single sided.
Set it to print 15 copies if you want one notepad or 30 copies if you want two notepads.
Cut the cover and pocket pages
Line the straight edge up using the lines that extend beyond the printed image. It should have you cut just barely inside the printed area.
Use the craft knife to carefully cut along the straight edge but only cut just beyond the image, don’t cut all the way from the top of the paper to the bottom. This will leave the paper outside the image connected so you can use the marks for the rest of the cuts around the image. Pass the craft knife along the straight edge in the same place a few times if needed to cut all the way through.
If you are using the pocket, use either scissors or the craft blade and the straight edge to cut out the pocket along the outer perimeter. Don’t cut the inner lines on the pocket, they are for folding on.
Cut the notepad pages
Divide the printed sheets of copy paper into two stacks of 7 and 8 or three stacks of 5.
Line them up and use the marks on the top one to cut through all of the sheets in the stack. Just like the cover and pocket, don't cut all the way from top to bottom of the page, just the printed part so the border of the paper stays intact while you cut it all out. (set the scrap paper aside to use to score the
Hold the stack in place firmly when moving the straight edge from one line to the next.
Glue the notepad together
Stack up all of the notebook pages and tap them on the table to square them up.
Place a scrap piece of cardstock on the front and back of the notepad at the top.
Brush some glue along cut edges at the top of the notepad and clip the top with the binder clips.
Let it set for about 10 minutes and then remove the clips and add a second coat of glue. Replace the clips.
Let dry for about 30 minutes.
Fold the cover and the decorative strip for the notepad
Place the cover, image side up on a stack of the scrap paper you just trimmed off to give it a bit of a cushion.
Place the straight edge just to the outer right of the right line on the spine of the cover so the bone folder travels right along the line.
Use strong force pressing down along the straight edge with the bone folder making a few passes to give it a fold line.
Repeat on the left line, placing the straight edge just to the left of the line and pressing firmly and drawing the bone folder along the straight edge several times.
Turn the cover over. You should be able to see the lines marked in the cover at least a little bit.
Firmly but gently fold the cover along one line and then along the other to form the cover.
Use the bone folder to crease the folds so the spine has nice corners.
Fold and apply the decorative strip
Use the bone folder to make a score line in the decorative strip along the line between the printed and blank parts.
Fold along the line so the decorative strip is facing out.
Fold the end of the decorative side to meet the back of the non decorated end and crease. This should give you about 1/4" spine on the strip.
Use the bone folder to crease it along that line.
Apply glue to the inside of the strip but only along the part that touches the back of the notepad.
Place the notepad in it with the top, back of the notepad glued to the strip and pressed all the way up to the fold line.
Fold the front part down over the front. You can glue the front down to the top sheet of the notepad if you like but I prefer to leave it so I can tear out the page from the top. It is entirely your preference.
Fold and apply the pocket
Use the bone folder to mark lines along the three lines on the pocket like you did on the cover and decorative strip.
Turn it over and fold the three edges in.
Use the bone folder to crease it really well.
Tear a piece of scrap paper the size of the pocket and put it inside the three flaps of the pocket so when you glue it down you don’t accidentally glue the pocket closed.
Apply glue to the three flaps and place it centered on the left inside the notebook cover with the opening towards the center.
Cover with a piece of parchment paper and place a heavy book on top of it until it dries. About 30 minutes.
Attach the notepad
Apply some glue to the strip on the top, back of the notepad and place it centered on the opposite side of the inside of the notebook cover.
Place a book on that until it dries too.
Extra Labels
I also included some blank labels if you want to cut them out and give your notebook a different title or add a name, just glue it over the space that says Notes on the cover.
Enjoy!
I would love to see your creation. If you share it on Instagram be sure to tag me @Littlegraysquirrel
- Megan
Notes
*Cardstock and poster board don't always indicate the weight or thickness. If it does, look for 100lb to 120lb cover weight.
I buy poster board from Dollar Tree. I believe it is about 120lb cover weight. It is 22”x28”. I use the straight edge and craft knife to cut it down. You can get 6 - 8 ½”x11” pieces from one sheet so it only costs $0.17 for the poster board for this project. It isn’t bright white though, it has more of an ivory or off white color.
License for use
License includes personal and commercial use. You are allowed to create unlimited notebooks to sell for a single person business printing in house. If you have employees or outsource your printing you are limited to 250 notebooks per file purchase. Please purchase an additional file for printing more than 250 notebooks.