DIY Baseball Keychain
Learn how to make your own keychain or bag tag that looks like a real baseball. These make great gifts for a baseball mom or dad or coach. They are also simple to make for a whole baseball team.
Read more**This post contains affiliate links. When you click these links I may make a commission on purchases made through those links. As an Amazon Associate I earn from qualifying purchases.** Please read our disclosure policy for more information.
This tutorial goes with the Baseball Keychain Template Cut File listing in my Etsy Shop.
Get the template here.
Click on the instruction card below to download a copy of the instructions, supplies, and tools needed.
After your purchase, you will receive a zipped folder with several files included. They are to be used in different ways.
You can either print out the template and cut your material by hand or import the file into your cutting machine software and cut with a cutting machine
File types included and recommended use:
Unzip or Extract File before trying to open and use them
PDF – Use this file to print on paper or cardstock to cut out by hand and use as a template or pattern to cut your material by hand. See notes below.
SVG (HTML) – Use this file in Silhouette Studio Designer Edition or above, Cricut Design Space or other cutting machine or laser software that uses SVGs.
DXF – Use this file type with Silhouette Studio if you only have Basic Edition of the software. If you have Designer Edition or above, use the SVG. This file type can also be used in some laser software but has not been tested in a laser, please test before attempting to cut several.
PNG – You can use this in Cricut Design Space or in any version of Silhouette Studio. The PNG I included is a transparent PNG. Silhouette Studio version 4.4 and above has PNG autotrace for transparent PNGs which will add cut lines for you.
JPG – This file is recommended for viewing only, it is not a good file type to print to use as a template or to import to a cutting machine software for cutting.
Font: You may want a sports style font for the name and numbers on the keychain. Here are some you might try:
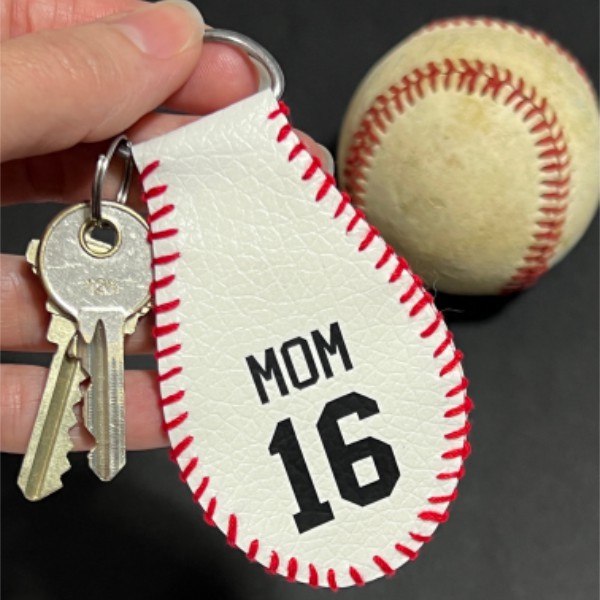
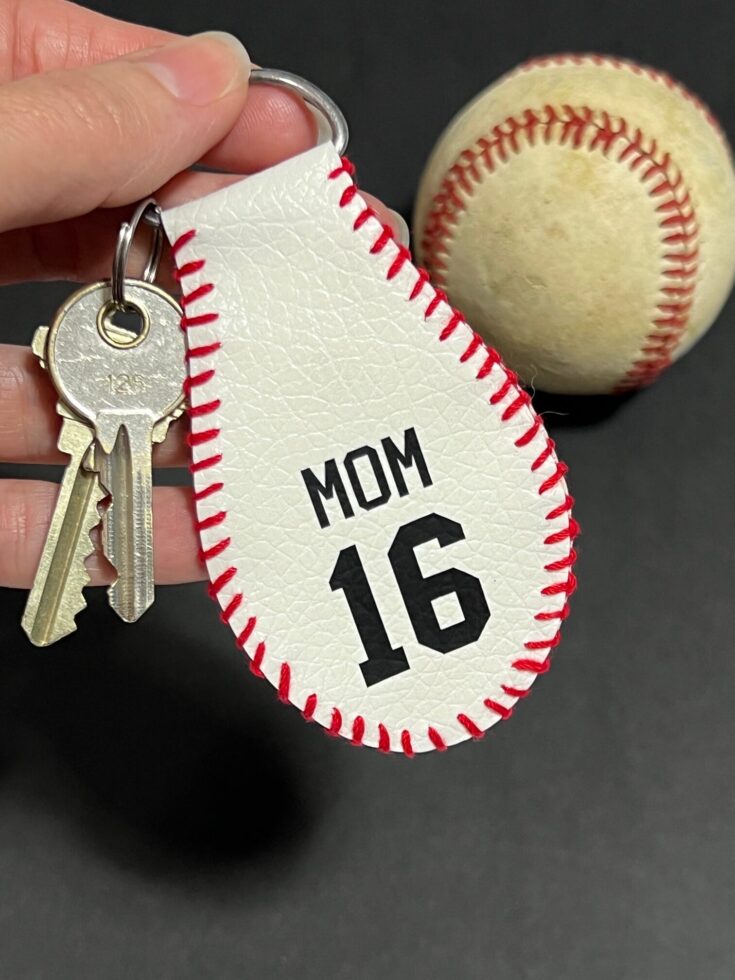
Sports Jersey – Free including commercial use. Mom and 16 in the photo are Sports Jersey Font
Basketball – Purchase for commercial use costs about $10. Coach and 01 in the photo is Basketball Font
Freshman – Free including commercial use.
Sport Champs Simple – $2 with commercial use
Supplies and Tools Needed
Leather or Faux Leather
Heat Transfer Vinyl (or you can embroider the name and number on but files are not included for that)
Teflon sheet or parchment paper
Heat or water erasable ink pen
#3 Crochet thread or Embroidery floss
Keychain hardware: 1.25” D ring or 1” Key fob hardware
Cutting machine or printer and paper
Scissors
Embroidery needle
Iron or Heat Press (if using HTV)
Weeding Tool (if using HTV)
Wide, flat key fob Pliers if using key fob hardware.
Get the template files
Make a Baseball Keychain
This tutorial goes with the Baseball Keychain Template Cut File listing in my Etsy Shop.
Get the files from my Etsy Shop here.
Find the clickable links to supplies on my website: https://www.littlegraysquirrel.com/diy-baseball-keychain
There are several files included to be used in different ways. You can either print out the template and cut your material by hand or import into your cutting machine software and cut with a cutting machine
File types included and recommended use:
PDF - Use this file to print on paper to cut out by hand and use as a template or pattern to cut your material by hand. See notes below. SVG (HTML) - Use this file in Silhouette Studio Designer Edition or above, Cricut Design Space or other cutting machine or laser software that uses SVGs. DXF - Use this file type with Silhouette Studio if you only have Basic Edition of the software. If you have Designer Edition or above, use the SVG. This file type can also be used in some laser software but has not been tested in a laser, please test before attempting to cut several. PNG - You can use this in Cricut Design Space or in any version of Silhouette Studio. The PNG I included is a transparent PNG. Silhouette Studio version 4.4 and above has PNG autotrace for transparent PNGs which will add cut lines for you. JPG - This file is recommended for viewing only, it is not a good file type to print to use as a template or to import to a cutting machine software for cutting.Font: You may want a sports style font for the name and numbers on the keychain. Here are some you might try:
Sports Jersey - Free with commercial use. Mom and 16 in the photo are Sports Jersey Font
Basketball - Paid with commercial use costs about $10. Coach and 01 in the photo is Basketball Font
Materials
Tools
Instructions
Instructions for printing:
- If you want to print the template on a piece of paper and cut out your template and material by hand, use the PDF file.
- Print on 8.5”x11” letter size paper, portrait orientation and normal (or as-is) print size.
- Do not change the print size to “fit to page”, change the scale, or make it borderless unless you want to make it bigger. I don’t know how it would turn out if you print it larger or smaller, I have only tested the template at the size it is.
- After printing, measure the square with a ruler to make sure it is 1" so you know the template printed at the correct size.
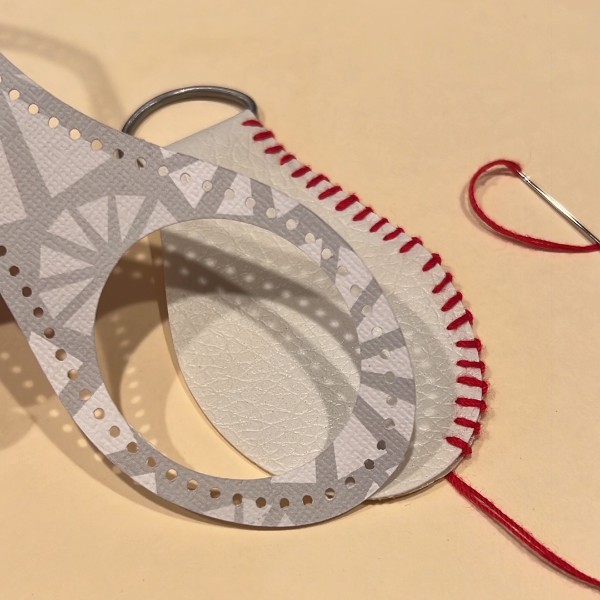
- Cut out the paper template and trace the pattern onto the back of your leather or faux leather and cut out the shape.
- Add the name and number by hand with permanent marker, using embroidery, or with pre cut letters or numbers.
- Poke the ink pen or needle through the template in each dot around the perimeter if you want to mark the holes before stitching it together.
- Feed the leather through the D ring if using.
- Fold the leather in half and match the ends together.
- Thread the needle with the thread or floss and beginning on one side of the D ring or top edge of the narrow part if using the key fob hardware, stitch the two pieces together using the ink dots or holes from the needle as a guide.
- Tie off the thread.
- Add the key fob hardware if using instead of the D ring.
Instructions for using a cutting machine:
- When importing the file into your design software, draw a 1” box in your software to compare the size of the 1” square in the file. If it isn’t the same size, select all of the parts of the imported file and grab the corner of the bounding box and drag it smaller or larger until the 1” box in the file matches the 1” box you created in your software.
- Once the design is the correct size you can ungroup it and drag away any text or parts that you won’t be cutting.
- Select the template with the holes and all of the holes and group them together so they don’t accidentally get separated.
- The solid template shape is to be cut out of your finished material, leather, faux leather, etc.
- The template with the holes in it is supposed to be cut out of paper or card stock to align the name and number if adding and to mark where to stitch.
- Grab the oval and place it on your design screen. Type your text and numbers and use this oval as a template to size your text and numbers. Align your design in the oval and leave the oval when you send it to cut. This will create an oval that matches the oval in the paper template for quick and easy placement of the vinyl on your material to press on with your iron or heat press.
- After you cut your vinyl, trim off outside the oval and weed off the excess vinyl
- Place the template on your cut out leather/faux leather and place your weeded vinyl where it belongs.
- Hold the vinyl in place and remove the template.
- Iron or press the vinyl in place.
- Once the text and numbers are added, place the paper template back on the leather/faux leather and using the heat or water erasable ink pen, mark a dot in each hole around the perimeter of the leather cut out.
- Feed the leather through the D ring if using.
- Fold the leather in half and match the ends together.
- Thread the needle with the thread or floss and beginning on one side of the D ring or top edge of the narrow part if using the key fob hardware, stitch the two pieces together using the ink dots as a guide.
- Tie off the thread.
- Add the key fob hardware if using instead of the D ring.